Wednesday, September 26, 2012

Here's the Deal

Good Morning!

I've decided to start off with a bang today by giving you all a
 
  10% DISCOUNT OFF
(Valid from 9.26.12 to 12.31.12)

So here's the code you'll need to enter.
 
10JKDESIGNS
 
Here's only few of my distressed signs. I do custom orders. So don't be shy. These are great for the home and as gifts :)


Be sure to spread the word... pretty please!
 
1. Follow my blog.
2. Comment about your fav item from my shop.
4. Fav an item on my shop.
5. Suggest an item that you'd like to see. 
5. Like me on Facebook.
6. Tweet me.
7. Recommend me to Google+
 
Thanks a bijillion!!
 
 
Jenn


Wednesday, September 12, 2012

Making Tier Stands

Hello there!
 
I'm super excited to show you something that is simple and easy to do. I love making these for two reasons.
 
1. cheap craft 2. pretty 
 
what's not to love?
 
 
For today's tier, I'm gonna show you how make a 2-tier stand for any occasion.
 
Supplies:
 
2 plates (Target)
candle stick (Goodwill)
E-6000 (JoAnns)
spray paint (optional)
wipes
 
 
1.Get your candlestick ready.
Okay, so now if you're me and found a cool candlestick but its ugly my option is to spray paint it. I thought it would neat to rough it up a little after it dried so this is how it turned out.


2. Plates please.
Here's the ones I choose from Target. Other options for cheap plates are Walmart, Goodwill, or other thrift stores. Clearance is good too :)


3. The glue, E-6000.
Now, if you've never used this glue it has pretty strong smell. Also it goes on fast once it starts coming out. So be careful not to get your fingers all sticky! (This glue is a really strong glue. It's meant for wood, metal, glass and other elements.)


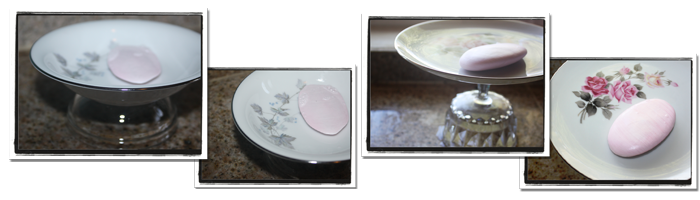
Put a bead around the top of your candlestick.
 
 
Center your candlestick.
I used the Target Home symbol on the bottom of the plate. Then make sure to wipe the excess glue


4. Repeat
Use steps 1-3 for the bottom of your plate. I used my best judgement to center the candlestick. But you can measure and mark off with a pencil to help center yours if that will help you.
 
 
5. Ta-da!
That's it. The End. See. Simple and easy.
Oh! But make sure to allow 24hrs to let the glue dry before using it.


Just for kicks, here are a few other tiers I've made to inspire you more.
 
Now, go make some tiers, my dears!
 
Jenn


Saturday, September 1, 2012

Turtle Cupcakes

 
Hello there!
 
Do you ever feel like you could be on Pinteret for hours browsing thru tons and tons of ideas? I know I do. I try my best to not to though. I limit myself... most of the time.
 
While I was there though, I found these cute turtle cupcakes on Pinterest for my RyRy's birthday. Aren't they cute?!


Thursday, August 30, 2012

Speak To Me

Hello Fellow Bloggers!

I thought we'd start off the day with a word of encouragement that spoke to my heart and needed to hear. I hope it will speak to yours.

Pinned Image
(quotesnsayings.net/)

I like knowing that even though we're always going thru those not-so good days there will always be light for us to see. Just knowing that God is always a prayer away brings comfort to me.


Jenn

Wednesday, August 29, 2012

My FB page

Hi there!

I just wanted to give my new readers a head's up on my FB pg. I finally got it going! Yay!


(Jennifer Kay Designs)
 
So here's to new beginnings and fresh ideas from me to you. Come check me out if you haven't already and like me! Thanks for stopping by!

Jenn


Tuesday, August 28, 2012

My First Desk Revamp


Today, I wanted to share with you my first desk revamp. This desk was an experiment from beginning to end.


It all started when I went on our church’s ladies retreat to the coast. My friend Wendie and I went on road trip searching for special treasures at local shops. We both were looking for something to either fix up or create into something beautiful. She found this desk and asked if we wanted to go in on it together. I said okay and that’s where it began.

Later on, after it was sitting at my home I took the first step and removed the ugly fake top. It was piece was a nasty fake brown marble laminated glued to a particle board. Who would want this in their house?


Sunday, August 26, 2012

Hello

Hello!

I'm Jenn Sandberg. In this blog, I hope to share my thoughts & tips, my faith, my family & friends, my finds & bargain shopping, and of course my love for crafts too. I like to design outside of the box and am learning more and more about the art of photography. This is all very new to me, but your welcome to follow me on my new journey of blogging.

Jenn